To successfully renovate a basement, begin by addressing any moisture issues with waterproofing and inspecting for structural integrity in compliance with local codes. Choose moisture-resistant flooring like vinyl or ceramic tile, and plan an efficient electrical layout with recessed lighting. Opt for ceiling installations that provide accessibility to utilities and complement the space aesthetically. Furnish strategically, using modular furniture to maximize space. For further insights on transforming your basement into a functional area, explore detailed guides and professional advice.
Key Takeaways
- Assess basement layout, ensuring compliance with local building codes and addressing structural and moisture issues before starting renovations.
- Choose moisture-resistant flooring such as vinyl or ceramic tile to prevent water damage and enhance durability.
- Implement waterproofing measures, including sealants and drainage systems, to protect against moisture and potential mold growth.
- Install a drop ceiling to provide easy access to electrical and plumbing systems while maintaining a comfortable ceiling height.
- Ensure professional installation of electrical systems and strategically place lighting to maximize functionality and ambiance.
How to Start Your Basement Renovation Project?
Initiating a basement renovation project requires meticulous planning, beginning with an extensive assessment of the space to determine its potential functionalities. This initial step is crucial for moving forward confidently with a significant amount of preparation.
Addressing moisture issues is essential to guarantee the longevity of the renovation, involving inspections for leaks and the implementation of waterproofing measures to minimize risks. Additionally, understanding and adhering to local building codes and obtaining the necessary permits are fundamental steps that must not be overlooked to ensure compliance and safety, especially when adding egress windows or reworking the top plate of framing for an entire room.
Planning Your Basement Remodel
When learning how to renovate a basement, thoughtful planning is crucial. First, assess the existing layout and square footage to maximize functionality without compromising structural elements.
For unfinished spaces, make sure to plan for dust control during the framing and drywall process. Prepping includes gathering materials like drywall sheets, insulation, and sealants. This is the stage where you’ll calculate all the drywall you’ll need based on measurements.
First, assess the existing basement layout to establish a functional design that maximizes space without compromising structural integrity. For those dealing with an unfinished basement, it’s essential first to confirm that all aspects meet local building code requirements, which can vary greatly by region.
These codes address critical safety standards, including ceiling height, emergency egress, and electrical installations. Additionally, a preliminary inspection should be conducted to identify any moisture issues, as these can undermine the structural integrity if not addressed early in the planning process.
Addressing Moisture Issues in Your Basement
Before commencing any physical renovations, addressing moisture issues in your basement is a fundamental step. Identifying and resolving moisture problems in your basement guarantees a durable and healthy environment.
Seal cracks, install interior drainage systems, and consider using mold-resistant materials, such as drywall, to finish walls. Combine that with rigid insulation and vapor barriers to keep natural light from being overshadowed by mold issues.
Begin by inspecting for signs where moisture appears, such as damp walls or pooling water near corners or the ground. Implementing basement waterproofing techniques, such as applying sealants or installing drainage systems, can prevent water ingress.
Additionally, insulating the basement walls plays an essential role in maintaining a dry space. Use rigid foam or spray foam insulation, and always include a vapor barrier to block moisture from penetrating the interior.
These proactive measures form the bedrock of a successful basement renovation, safeguarding against potential water damage and mold growth over the long term.
Understanding Local Building Codes and Permits
Understanding local building codes and permits is vital when planning your basement renovation project. These regulations guarantee that diy projects and wall and ceiling installations meet safety standards, particularly concerning electrical work and plumbing systems.
Before starting, consult your local building department to understand specific requirements for a finished basement. This step not only helps in obtaining the necessary permits but also in preventing potential legal and safety issues.
Compliance with building codes also greatly affects the future insurance and resale value of your home. Detailed plans should include all modifications to the structure, electrical, and plumbing systems, ideally prepared by a qualified professional.
Whether you’re turning your basement into a rec room, bathroom, or additional living space, make sure to follow building code rules. Many municipalities require permits for electrical, framing, and HVAC installations, especially when the project impacts the main floor layout or involves egress windows.
Prepare floor plans showing how you’ll use the square footage, and be prepared to demonstrate that you’ve accounted for proper ventilation, ceiling heights, and safety exits.
What Are the Best Practices for Basement Walls?
Proper framing and drywall installation enhance the structural integrity and aesthetics of the space. Moving forward with the right materials ensures a significant amount of improvement in both function and appearance.
Additionally, implementing long-term moisture prevention strategies is essential to protect against potential water damage and mold growth, especially in the rest areas of the basement near the ground and corners where moisture tends to collect.
Choosing and Installing Insulation
Energy-efficient insulation helps regulate temperature and prevents moisture issues. Use foam boards and ensure tight seals between sheets. Always install insulation before hanging drywall sheets, and secure everything using a nail gun for a quick and clean finish.
Insulation boards, particularly those made from polystyrene or foam insulation, are a good choice for basement environments. These materials are not only resistant to moisture but also offer a warm thermal barrier.
When installing insulation, please make certain that it extends from the top of the basement walls down to the concrete floor, creating a continuous thermal barrier. This method prevents any thermal bridging, which can occur when heat bypasses the insulation through the building materials.
It’s important to secure the insulation boards tightly against the basement walls to avoid gaps that can lead to energy losses and moisture ingress. Putting insulation carefully on every side and section ensures better protection.
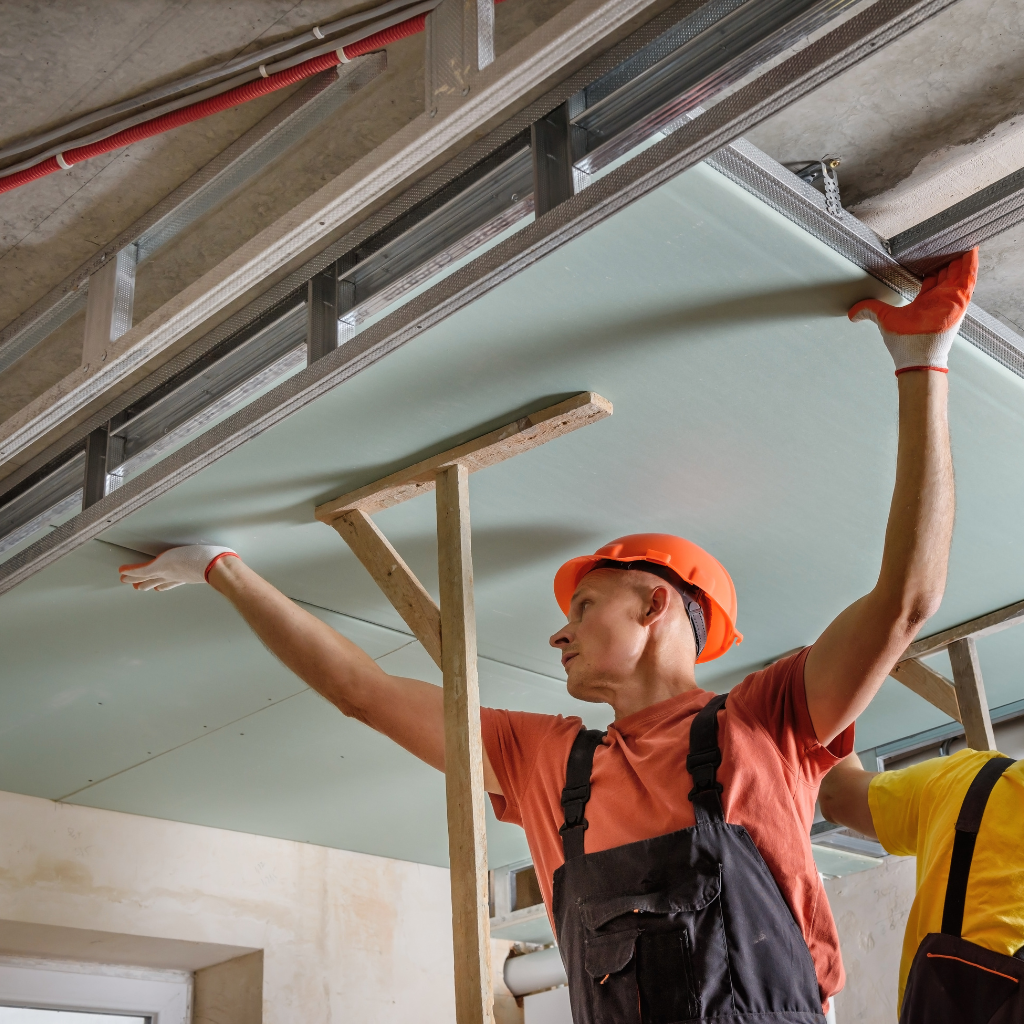
Framing and Drywall Installation Tips
After selecting and installing the proper insulation for basement walls, the next step in basement renovation is framing and installing drywall.
For drywall, start by hanging full sheets horizontally and fill gaps with joint compound. Check for protruding screw heads and sand them flush for a professional finish. Make sure all the drywall is securely fastened and free from warps to ensure clean paint application later.
When it’s time to install drywall, begin by measuring and cutting the boards to fit the frame, paying close attention to openings for windows and doors.
Hanging drywall involves positioning the panels against the studs and securing them with drywall screws spaced about 8 inches apart. This process not only covers the framing but also adds a layer of fire resistance and noise insulation to your basement walls.
This course of action, although it may take hours, will deliver a smooth, finished surface that is ready for painting or further refinishing.
Long-Term Solutions for Preventing Moisture in Basement Walls
Guaranteeing the long-term dryness of basement walls is essential for the structural integrity and air quality of a home.
Preventing moisture in your basement is pivotal to avoiding mold growth and structural issues. Proper sealing of basement walls against external water sources is critical. Use waterproofing coatings and membranes specifically designed for below-grade applications to create a moisture barrier.
Additionally, drainage around the home’s foundation should be improved to prevent water accumulation. Before painting your basement walls, verify they are thoroughly dry and treated with anti-mold paint to further protect against moisture ingress.
Check wall insulation and fill dips deeper in the concrete slab before flooring installation. Every small detail makes a difference when trying to create a truly dry, livable basement.
How to Choose the Right Basement Flooring?
Choosing the right basement flooring begins with understanding the various concrete floor options available, which offer durability and moisture resistance essential for below-grade spaces. When selecting, keep in mind budget friendly basement materials to help save money while still achieving quality.
Installing new flooring over existing basement concrete requires careful preparation and selection of materials that can handle potential moisture issues, especially around concrete walls. Properly preparing the bottom plate and using plywood or moisture-resistant underlayments can help reduce condensation and moisture damage over the decades.
Additionally, maintenance tips for basement flooring guarantee longevity and preserve the aesthetic appeal of the investment. Regularly inspect floor joists and address any pressure points or condensation early to avoid costly repairs later.
Understanding Concrete Floor Options
When considering basement renovations, selecting the appropriate flooring is essential, particularly when dealing with concrete floors. The scope of work often includes dealing with uneven surfaces, which may require a skimmed concrete overlay to provide a smooth base.
For those finishing a basement floor, understanding the intricacies of the surface is imperative. The durability of a basement floor often necessitates the use of concrete screws, which require pre-drilled holes made with a masonry drill. This preparation guarantees the flooring material adheres properly to the concrete base.
When choosing the type of floor using these tools, consider factors like moisture resistance, load-bearing beam capacity, and style preferences — whether you prefer a bright, modern look or an industrial look with exposed structural elements. Properly selected and installed flooring can transform a basement into a functional and aesthetically pleasing new space.
It is important to evaluate the specific requirements of your basement to select the most suitable flooring option that fits within your funds and meets your desired design ideas.
Installing New Floor Over Basement Concrete
Having discussed the importance of preparing a concrete floor for renovation, the next step involves selecting and installing the right type of flooring over the basement concrete.
During a basement renovation, choosing a new floor that complements the overall open floor plan is vital for both aesthetics and functionality. When finishing a basement, consider moisture-resistant options such as vinyl, ceramic tile, or engineered wood, which are well-suited to the typically humid basement environment.
Each flooring type has specific installation requirements; for instance, ceramic tiles need a moisture barrier and a sturdy adhesive, while engineered wood may require underlayment for better insulation and moisture control.
Proper selection and installation guarantee durability and enhance the value of the basement space. For example, installing bottom plates carefully and ensuring all edges are sealed with primer and caulk will help create a permanent moisture barrier and keep the basement finishing long-lasting.
Maintenance Tips for Basement Flooring
After selecting the appropriate flooring for a basement renovation, maintaining its condition becomes paramount to guarantee longevity and aesthetic appeal.
Regular inspection of floor joists and the subfloor is vital, particularly in a basement space where moisture levels can be high. Make certain that any signs of dampness or damage are promptly addressed to prevent structural deterioration.
For routine care, use cleaning products that are suitable for the specific type of flooring installed in your finished space. Avoid using excessive water, especially on materials like laminate or wood, which are susceptible to water damage.
Implementing strategic placement of rugs and mats can also help protect high-traffic areas. Following these maintenance tips for basement flooring makes sure that your basement finish remains durable and visually appealing.
Also, don’t let all the debris from construction sit too long. Sweep and mop regularly with products suited for your flooring type to maintain a clean and safe environment.
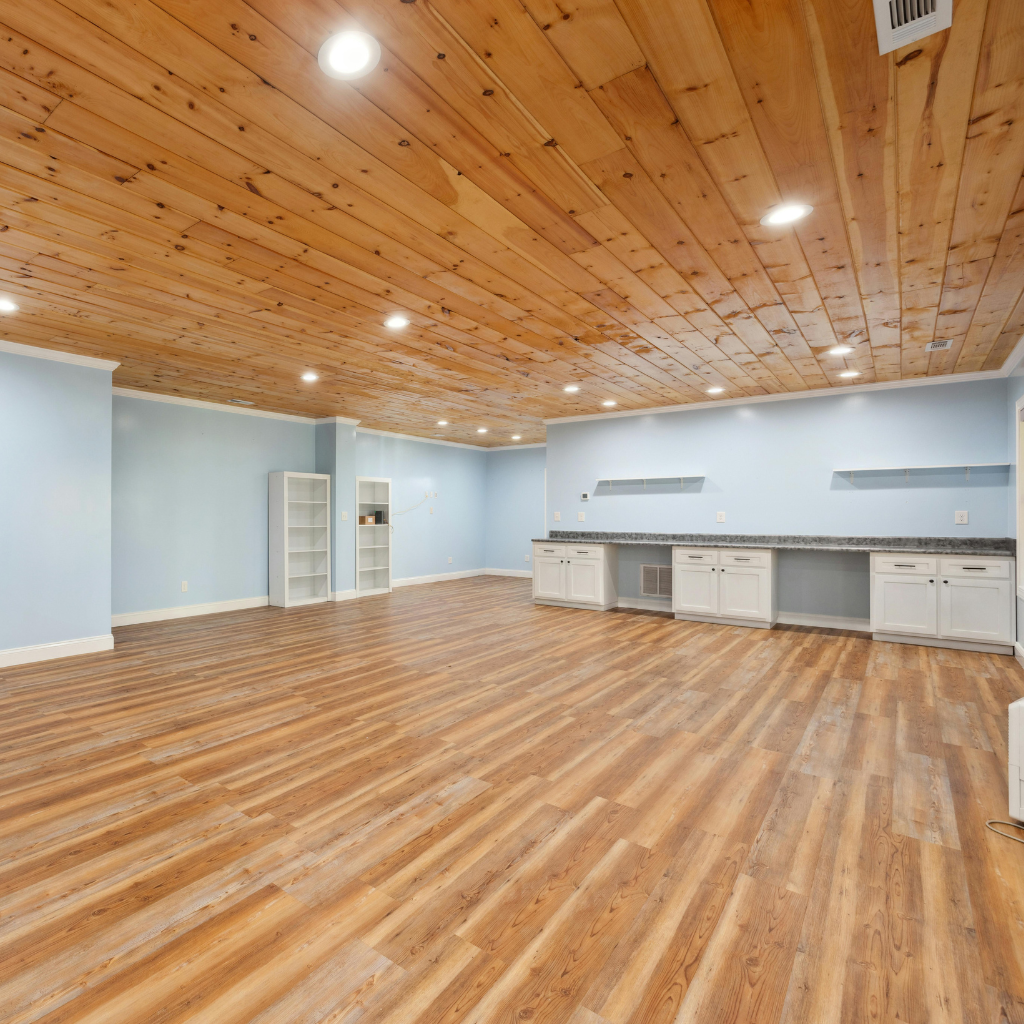
What to Consider for Basement Ceiling Installation?
When planning basement ceiling installation, it is essential to determine the appropriate ceiling height and consider the option of a drop ceiling to enhance accessibility and aesthetic appeal.
Addressing the constraints imposed by existing joists and plumbing systems can dictate the extent of modification possible and impact overall project feasibility. These structural and spatial considerations will guide the selection of materials and the insertion of top and bottom plates to frame the ceiling properly.
Using plywood and proper instructions for mounting the ceiling structure ensures a solid and durable installation. Properly connecting all framing elements with clips or nails and using a hammer ensures the ceiling will stand the test of time.
In some cases, leaving ductwork and electric wiring exposed can contribute to an appealing industrial or open floor plan style, which is a popular design idea for modern basements. Keep in mind that ceiling installation is one of the most expensive parts of basement renovation, so spending wisely and planning for the entire project budget can help you save money in the long run.
Selecting the Right Ceiling Height and Dropping the Ceiling
Selecting the appropriate ceiling height and installing a drop ceiling are essential steps in renovating a basement. The ceiling height considerably influences both the aesthetics and functionality of the finished space. Ideally, a basement ceiling should be high enough to create a comfortable, open feel.
However, existing ceiling joists and the desire for a drop ceiling can dictate the final height. A drop ceiling offers easy access to plumbing, ducts, and electrical systems above while still allowing for a polished look. Keep in mind that drop ceilings allow access to those systems, which is helpful if your basement shares circuits with the main floor. They’re also ideal for managing noise transmission and cooling costs.
When planning the basement ceiling, consider the impact of both the ceiling height and the type of drop ceiling on the overall environment and usability of the basement. This careful planning guarantees a functional and visually pleasing finished ceiling. It can also help reduce heating and cooling costs in the long run.
Dealing with Joist and Plumbing Constraints
Maneuvering the constraints posed by existing joists and plumbing systems is a critical aspect of basement ceiling installation.
When planning the ceiling layout, consider the placement of mechanical systems, including plumbing, water pipes, and electrical components. These elements often require easy access and maintenance clearance, influencing the ceiling’s final height and design.
To maximize usable space, strategically design these fixtures by incorporating drop ceilings or soffits in areas with dense mechanical configurations. This approach guarantees that the basement remains functional without compromising the aesthetic or structural integrity of the ceiling.
Additionally, consult with professionals, such as a licensed electrician, to verify that all modifications meet local building codes and standards, thereby enhancing the safety and functionality of the renovated space. Drop ceilings can also help conceal awkward runs of plumbing without reducing too much headroom, which is important for maximizing the comfort of your new room. Use a laser level when aligning ceiling grid lines to ensure good shape and clean lines.
How to Create a Finished Basement Living Space?
Creating a functional floor plan is the first step in transforming a basement into a usable living space, ensuring areas are designated for specific activities while maintaining fluid movement throughout. This kind of basement conversion can increase property value and be a great way to add an extra bedroom, home gym, or even an in law suite.
Next, it is essential to incorporate adequate electrical work and strategic lighting to enhance both the functionality and ambiance of the basement. Hiring a licensed electrician for this part of the job is highly advised.
Finally, choosing the right furnishings will maximize comfort and utility, effectively turning the area into an inviting extension of the home.
Designing a Functional Floor Plan
Designing a functional floor plan for a finished basement living space begins with an assessment of the existing structural elements, such as support columns, utilities, and ingress and egress points. Be sure to mark out dimensions using a pencil and tape measure, and always plan.
Architects and designers must navigate these fixed features to maximize the usability of the space. A well-thought-out finished basement layout not only optimizes additional living space but also integrates effective storage solutions. Baseboards and interior walls should be installed cleanly and aligned with a laser level for a professional finish.
Strategically placing closets and built-in cabinets can help maintain an uncluttered environment conducive to various activities. When deciding how to use your basement, consider zones for different functions, such as a home office, entertainment area, or guest quarters. Incorporate durable materials like vinyl flooring to make the space more resistant to wear and moisture. This also keeps your total cost and labor in check.
Thoughtful planning guarantees that each area is accessible and comfortable, enhancing the overall utility and enjoyment of the newly renovated space.
Incorporating Electrical Work and Lighting
After establishing a functional floor plan for the basement, the next step involves the careful integration of electrical work and lighting, which are key components in transforming the area into a vibrant and usable space.
Professional installation of electrical wiring is essential, guaranteeing that power is efficiently distributed to various zones. Recessed lights can offer a sleek, modern look while maximizing ceiling height.
The strategic placement of light fixtures enhances the ambiance and functionality of the space. Throughout the process, verify that all drilled holes for wiring do not compromise structural integrity. Using shims may be necessary to adjust fixture boxes or wall studs.
The project culminates with a final inspection by a certified, licensed electrician, confirming that the electrical installations meet safety standards and local building codes. Installing switches, outlets, and cables correctly from the beginning will save you money over time. Keep the total budget in mind and coordinate with your general contractor to stay on track.
Furnishing Your Basement Space Effectively
Once the essential electrical and lighting frameworks are in place, the next phase in basement renovation is furnishing.
To effectively transform your basement into a vibrant living space, consider the intended function of the area. If creating a family room, choose comfortable, durable furniture that invites relaxation and accommodates multiple activities. Add rugs or carpet to provide warmth and soundproofing. You may also want to install a fireplace for added comfort.
For a game room, incorporate versatile game tables and ample seating to guarantee it becomes a hub of entertainment. Utilizing modular furniture can maximize the extra space, offering flexibility for various uses.
Modular furniture lets you reconfigure your space easily, especially if your basement doubles as a guest room or rec room. Choose multipurpose pieces that include storage. Adding baseboards and applying caulk to seams will complete the finishing touches.
Thoughtfully selected decor can seamlessly integrate the basement with the overall aesthetic of your home, making it a true extension of your living space. Add a few large mirrors or light-colored decor to reflect natural light, making the space feel bigger. Just remember to leave enough airflow for proper ventilation—essential for both comfort and health. Be sure your HVAC ducts or vents are not obstructed and allow fresh air to circulate. If planning to sell your house, a finished basement can significantly increase your resale value.
Conclusion
In summary, renovating a basement requires careful planning and execution. Begin by evaluating the space and addressing any moisture issues. Opt for materials suitable for basement conditions when selecting wall treatments and flooring. A well-installed ceiling enhances both aesthetics and functionality. By thoughtfully designing the living area, homeowners can maximize usability and comfort. Adhering to these guidelines guarantees a successful transformation of a basement into a valuable and enjoyable extension of the home.
A well-installed ceiling enhances both aesthetics and functionality. By thoughtfully designing the living area, homeowners can maximize usability and comfort. Finishing touches like trim, baseboards, and caulking make a noticeable difference. Adhering to these guidelines guarantees a successful transformation of a basement into a valuable and enjoyable extension of the home. This type of home improvement project, while a difficult task at times, can be tackled successfully with the right plan, tools, and professional advice.